What is chimney sweeping? Chimney sweeping is the process of cleaning the interior of a fireplace flue, usually with specialized brushes, to remove any buildup or obstructions that may hinder air flow or create a fire hazard. Regular chimney sweeping is a critical part of home maintenance and fire safety. A chimney dirtied with buildup is not only inefficient but dangerous. The process should be performed by a skilled technician, ideally one certified by the Chimney Safety Institute of America. Why is chimney sweeping necessary?
When you light a fire in your fireplace, as the smoke travels up the chimney, it leaves behind deposits of creosote, a byproduct of combustion. In addition to being highly combustible, creosote buildup also hinders airflow and reduces draft, which is necessary for complete combustion. In its initial stages, creosote is flaky and sooty and thus easily removed with chimney brushes. Over time however, as more fires are burned and more creosote is deposited on top of this initial layer, the buildup becomes thicker, harder, and more difficult to remove. Draft is further reduced, more creosote is deposited, and this process continues until the creosote is removed (or there is a chimney fire). In addition to the removal of creosote, routine chimney sweeping will also remove any animal nesting or plant debris that can obstruct the flue and also create a fire hazard. Placing a chimney cap will prevent animal entry, and a savvy chimney sweep will always recommend a cap if one is not present. How is a chimney swept? A chimney can be swept in one of two ways, down through the top of the flue on the roof (top-down), or up through the fireplace (bottom-up). Some companies may perform one method more often than the other due to preference or tech experience, although sometimes the structure of the chimney or fireplace itself will determine which method should be utilized. Whether from the top-down or the bottom-up, the tool of choice for chimney sweeping is usually a series of connected flexible rods, adjustable in length to suit the height of the chimney, to which brush heads are attached. One of our technicians swears by the Viper GFK Chimney Cleaning System. The brush heads vary in size to allow for different flue shapes and sizes, and the brush bristles can be made of plastic (generally used in metal-lined flues) or metal (used in clay flue liners). Once inserted into the flue, the brush is moved up and down repeatedly until the creosote or any other debris has been thoroughly loosened and falls to the floor of the firebox, from where it is vacuumed. In cases where creosote buildup is more severe, chains or chemicals may be needed to effectively remove it. When should a chimney be swept? The general recommendation on frequency of chimney sweeping is after every 30-50 fires. Among the factors that affect how frequently it's recommended would be what type of wood you're burning (hardwoods produce less creosote) and how well-seasoned the wood is (the dryer the wood, the less smoke it produces, and thus less creosote). Spring is the ideal season to have your chimney swept, for several reasons. This is the slow season for chimney sweeps, so setting an appointment won't be a challenge like it will be as winter approaches. Also, the roof will be free from snow or ice and more easily climbed by the technician if he'll be working (or inspecting) from the rooftop. And finally, if any issues of disrepair are found, you'll have all summer to collect quotes and arrange to have the work completed before fall, when chimney repair technicians are very hard to come by. How much does a chimney sweep cost? You can expect to pay between $80 and $200 to have your chimney swept. There are several factors that can affect your final cost. If you choose to have your chimney inspected (especially with a camera), this will likely increase your cost, though some companies include at least a level 1 inspection for no additional charge. If any part of your chimney (or wood stove) requires disassembly in order to effectively sweep it, this too may add to your cost. If you're having more than one fireplace cleaned (which would mean more than one flue), expect to pay more. It is a common misconception among homeowners that two fireplaces that share a chimney will count as one job; it doesn't—no two fireplaces share a flue, and it's the flue that's being swept, after all. Wanna dig deeper? Download our free tipsheet: 5 Questions to Ask Before Hiring a Chimney Cleaning Company. Download Tipsheet Many thanks to our technicians Ben and Kris for lending their expertise to this article.
0 Comments
What is air duct cleaning? Air duct cleaning is the process of removing dirt, debris, and the general filth that comes to inhabit a building's heating and cooling ducts over time. While residential air duct cleaning refers to the process as it applies to homes, commercial air duct cleaning applies to business or industrial sites, including multi-unit dwellings such as apartments or assisted-living facilities. 
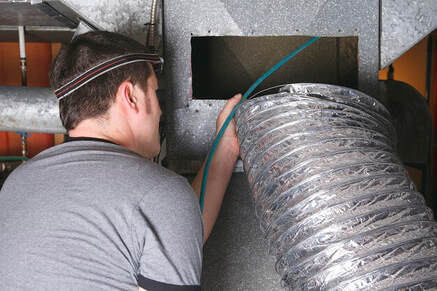
Why is air duct cleaning necessary?
In a nutshell, debris in the HVAC (heating, ventilation, and air conditioning) system hinders air flow, and the system relies on good air flow in order to function optimally. Dirt in the air ducts spreads to other components of the HVAC system—the furnace, evaporator coil, etc—clogging up parts and reducing efficiency. In a commercial setting as well, air moving through dirty ducts is going to affect the performance of the system as a whole, which is why it is recommended that all system components be cleaned at the same time. Cleanliness of the air ducts also affects indoor air quality. Air moving through dirty ducts is eventually going to end up in the occupied space and, by extension, in your family's (or your employees') lungs. Clean air ducts mean fewer pollutants being pushed into the room through the vents. How are air ducts cleaned? Most companies offer a few different levels of service, depending on how dirty the ducts are and how long it's been since they've been cleaned. Typically the basic level of service will involve blowing air into each of the vents via a high-pressured air wand or air trigger, in combination with the negative pressure of a vacuum and a containment system to capture the debris. This basic process is usually referred to as the "push-and-pull" method. Higher levels of service will add the use of agitation tools—air whips, rotary brushes, etc—to physically sweep the walls of the ducts, dislodging debris and sending it toward the vacuum. Commercial duct cleaners will use methods similar to those of residential cleaning, with the addition of some more specialized tools, and a physical crawl-through method if duct size allows. When should air ducts be cleaned? For residential jobs, air duct cleaning is generally recommended every one to three years, depending on several factors, including whether pets are present, whether the occupants have allergies or asthma, whether remodeling or construction has recently taken place, etc. It's especially recommended after new construction or remodeling, when large amounts of dust and debris tend to be generated. Drywall dust is particularly insidious. In a commercial setting, the recommendation is roughly every 5 to 10 years. Most commercial duct cleaning companies will send a project manager to assess the condition of the air ducts and HVAC system at no cost, in order to provide an estimate for cleaning as well as a timeline for future work. When deciding to clean or not to clean, the appearance of the visible components of the duct system (vents and register covers in a residential system, diffusers and grilles in a commercial system) is a fairly reliable indicator of whether the ductwork system as a whole should be assessed for cleaning. Register covers sporting dust bunnies, for example, aren't likely to have pristine air ducts behind them. How much does air duct cleaning cost? Costs for cleaning residential air ducts are all over the map. Some companies charge per vent, while others charge by total square footage, and a lesser number will only quote a price on seeing the home firsthand. Some company-based factors that will affect pricing are technician experience (skilled techs command a higher wage) and company reputation and longevity (a well-established company can weather the seasonal highs and lows of the industry without having to slash prices in order to remain in the game). Some factors that will affect pricing for your home in particular are how large it is (or how many vents), how many systems it has (one heating or cooling unit represents one system), and which level of cleaning you choose (how dirty your ducts are). A reputable company will spell out all costs before work begins. The you-get-what-you-pay-for adage applies well here: a "$49 duct cleaning special!" will buy you the lowest tier of service and will probably apply only to the smallest of homes without surcharge. Very generally speaking, you should not expect to pay less than $400 for a quality duct cleaning on a home of average size (around 2500 sq ft according to most estimates). Wanna dig deeper? Download our free tipsheet: 10 Questions to Ask Before Hiring an Air Duct Cleaning Company. Download Tipsheet Dryer vent cleaning is a critical part of home maintenance and fire safety, as the dryer vent line serves as the exit for hot, humid air produced by your clothes dryer. When this line is obstructed, especially with combustible debris such as lint, it creates an extreme fire hazard. But as our technicians often observe, lint is not the only combustible debris to clog a dryer vent line and create problems Why do birds build nests in dryer vents?
Birds (and other animals) are naturally drawn to dryer vent openings because of the warmth generated by the dryer and the relative safety and seclusion that the dryer vent would seem to offer. But that appearance of safety is deceptive. Birds, especially young ones, often become trapped inside, unable to escape the enclosed space. Further, the dry sticks and leaves that they skillfully place inside their "home" are easily combustible when combined with tiny bits of dryer lint and blasted with hot air from the dryer. Prompt and thorough removal of the obstruction is necessary to ensure the safe and effective operation of your dryer. How do you clean a bird's nest from a dryer vent? One of the most effective tools for cleaning a dryer vent line is a reverse spinning skipper ball, which is fed through the dryer vent via an air hose, all the way through to the dryer. The tool is easily pushed through soft dryer lint (unless heavily clogged). With nesting, however, the twigs and leaves tend to be tightly compacted, such that the tool cannot easily push past it and then be used to pull out the nest intact. For this reason, the technician will first reach in and manually pull as much of the debris out by hand as he can reach. Birds rarely build nests very deep within the vent, and almost never in the vertical run of the vent line but rather in the horizontal run, closer to the exit (or entrance, depending on whether you're a bird or hot air). Once the bulk of the debris, or at least the reachable bulk, has been removed, the tech will send in the skipper ball on the end of an air line. He pushes it in and pulls it out successively, as it spins around and reverse-blasts air from the tiny holes on its surface, removing the nest a bit at a time. The job is complete when he can send the tool all the way through to the dryer itself and pull it out without expelling any more debris, whether nest or lint. How can I prevent birds from building nests in my dryer vent? Your dryer vent should have a cover to prevent animal entry. There are many shapes and sizes of dryer vent covers available, but not all are equally suitable. The ideal cover for a dryer vent consists of a louvered flap. The flap swings open when hot air from the dryer forces it open, and then falls back into the closed position when the dryer stops. In this manner hot air can escape but animals cannot enter. An important point to remember is that a dryer vent should never have a screen over it, as soggy lint eventually clogs the tiny holes, obstructing airflow and creating an extreme fire hazard. Dryer vent covers can be found at any home improvement store. You can install it yourself or ask your dryer vent cleaning technician to tackle the job. Mother Nature will thank you for protecting her feathered offspring, and your clothes dryer will thank you for letting it exhale unobstructed. Wanna dig deeper? Download our free tipsheet: 5 Questions to Ask Before Hiring a Dryer Vent Cleaning Company. Download Tipsheet Many thanks to our technician Ben S for lending his expertise to this article. Air duct cleaning in commercial buildings, as opposed to homes, because of their larger size and various ductwork configurations, tends to be a more complex process. There are several different methods for cleaning commercial ductwork, but hands-down the most effective is the crawl-through method. This would be the preferred method when the ductwork is very large—big enough for a technician to fit into—in settings such as multi-floor office buildings, hospitals, community centers, etc What is the crawl-through method? Just as it sounds, this method involves the technician physically entering the ducts, typically through a 16-inch access point, and cleaning them from within, working his way slowly from one end to the other. Because of the high level of dust and debris inside, he wears personal protective equipment (PPE), including a Tyvek suit, a respirator, and gloves. Because of the technician's close physical proximity to the ductwork interior, as opposed to being outside of the ductwork feeding tools into it, he is able to exercise direct control over the movement of the tools rather than relying on air pressure to propel them, resulting in a much more thorough cleaning. If a duct that is large enough to be crawled through were cleaned merely with tools, such as tentacled air whips or a brush system, without the tech physically entering the duct, the results would be inconsistent and unimpressive. The tool would simply not be able to cover all the surface area of the duct; it would likely bounce around in the center of the duct and hit a few surfaces but leave scattered clean and dirty areas. Additionally, the many off-runs would diminish the suction of the vacuum, whereas in the case of the crawl-through, the vacuum attachment (the brush head) is physically touching every surface. What is the process? Depending on the height of the ductwork, after creating the access point, the technician will use a 6- to 12-foot ladder (or a lift for higher systems) to enter the ductwork. He'll bring with him a length of hose appropriate for the amount of duct he'll crawl. The hose is attached to an industrial-strength HEPA-filtered vacuum. At the end of the vacuum hose that he holds are various attachments, including a 3-inch round brush head, a 14-inch brush head, and a foxtail brush (for cleaning turning vanes). The technician begins the process on his back, starting with the top of the duct, working in arm's-length sections. He brushes methodically back and forth using the 14-inch brush head to dislodge and suction the bulk of the debris. Then he turns to his side and focuses his attention on the walls of the ducts, again methodically swiping from side to side. Finally, on his hands and knees to clean the floor of the duct, where some of the dislodged debris now sits, he switches to the 3-inch brush, which has greater suction than the 14-inch, to do a final, thorough clean of that section. How are turning vanes cleaned? The technician proceeds in this manner through the length of the duct, sweeping back and forth, until he reaches a turning vane. Turning vanes are located at 90-degree turns in ductwork and assist the air in changing direction with minimal loss of airflow. Because they are generally not removable, the technician must exit the duct at that point (through an access point created earlier). But before he does, he uses a foxtail brush to thoroughly clean the fins and walls of the turning vane before vacuuming it up with the powerful suction of the 3-inch brush head. Back inside the duct on the other side of the turning vane, through another access point, the technician will use the same method to clean the other side of the turning vane, and then proceed in a similar fashion down the length of the ductwork until the job is complete and all runs have been thoroughly cleaned. How much does it cost to clean commercial ducts with crawl-through? Most commercial air duct cleaning companies will provide free estimates and consultations to companies considering having the work performed. The project estimator will have a look around the facility, consult with building supervisors, and study the facility's blueprints, if available, in the process of providing an estimate. Some of the factors that he'll take into consideration when determining price would be how many linear feet of ductwork are involved, how many AHUs (air handling units) are associated with the ductwork, whether there are any reheat coils or VAV boxes that need to be cleaned, and what style of supply diffusers and return grilles are present. Technician experience and company reputation will also play a role in the final estimate price. Skilled, qualified commercial technicians rightly yield a higher labor cost, and companies who invest in consumer awareness and customer satisfaction generally have less need to slash prices in order to attract clients. Wanna dig deeper? Our commercial air duct cleaning page contains detailed descriptions, before and after photos, and videos of our commercial duct cleaning processes. View Commercial Duct Cleaning Page Many thanks to our commercial project manager Ben S for lending his expertise to this article. The bathroom is probably the first place we think about when we consider household mold. It's often found on grout in between tiles, on caulk that lines the bathtub and sink, on the shower curtain, even on the ceiling and walls—anywhere that's been exposed to excessive moisture or humidity for an extended period of time. What causes mold in the bathroom?
Because mold thrives in a warm and humid environment with limited air flow, bathrooms are the perfect breeding ground for this fungus. Showers, especially warm and/or lengthy ones, probably contribute more frequently to bathroom mold issues than any other single activity. The grout in between shower tiles is especially susceptible, as this area is often pounded by water, and grout itself is porous, so water can seep in and sit, potentially cultivating mold. Another frequent contributor to bathroom mold is the slow drip of a leaky pipe that has gone unnoticed. A water intrusion event that has not been completely dried, such as an overflowed toilet or bathtub, could also result in a mold infestation. For example, if the large volume of water was not removed quickly enough, or if the job was considered "done" before the moisture content of the materials and the humidity level reached acceptable levels; under these circumstances mold can easily take root, which is why timely and thorough water mitigation is necessary after water intrusion. How do I prevent mold in the bathroom? To prevent mold from taking hold in your bathroom, humidity must be kept in check and any areas where water regularly pools must be dried completely, such as the floor just outside the bathtub or shower, the area behind the sink faucet, etc. Additionally, grout should be sealed, and caulk should be replaced when it shows signs of deterioration. It's a good idea after each use to rinse out the shower (to remove any soaps or oils) and then use a towel or squeegee to remove excess water from the shower walls. There are commercial products available, such as Tilex, that can be applied daily to thwart the growth of mold and mildew, and a vinegar/water solution can be applied as a natural alternative, though you'd want to rinse it off after a period of time so the smell does not linger. Every bathroom should have an exhaust fan, and this should be run during each shower and for about a half-hour afterward (depending on how many cubic feet per minute your fan can move) until all moisture has been exhausted from the room. An open window can serve a similar function, though not as effectively or quickly, and not in every climate. Additionally, any leaks or flooding should be promptly addressed and the area thoroughly dried, using a dehumidifier and fans if necessary. The longer water sits in a particular area, the more likely mold is to take hold. How do I remove mold in the bathroom? There are a lot of DIY methods for mold removal that homeowners can try, especially if the area in question is limited in scope and material affected. These include the use of vinegar, baking soda, hydrogen peroxide, Borax, and other common household products. (Bleach is not recommended, as it does not penetrate porous surfaces and so cannot kill the root system.) Home improvement stores also stock a variety of mold removers. It's important to remember, however, that any DIY attempts at mold removal should be accompanied by an appropriate amount of research on how to effectively and safely complete the task. Proper precautions must be taken to ensure that adjacent areas aren't contaminated in the process and that spores are not inhaled. If there is any question as to whether the type of mold involved is of the toxic variety, a mold testing professional can be hired and a sample sent to an accredited lab. There are several circumstances under which you'd want to consider professional mold remediation, including if the area affected is large and involves different types of material, if the mold species is toxic, if you or anyone in your family is sensitive or allergic to mold, or after a water intrusion event, especially if the water involved is blackwater. A properly trained mold remediation specialist will be equipped to gauge the extent of the mold problem and pinpoint its origin (if unknown), and will carry out removal according to established industry standards. He begins the process by donning PPE (personal protective equipment) and sealing off the area affected, placing it under negative pressure so as not to contaminate other areas of the home. Materials that are not salvageable (Sheetrock, carpet, etc.) would be demoed and placed into sealed plastic bags for proper disposal, again so as not to contaminate other areas of the home as they are transported outside. All surfaces in the affected area would be HEPA-vacuumed to remove mold spores. A fungicide should be applied, capable of penetrating porous surfaces and killing the root system. Finally, the surfaces should be HEPA-vacuumed once more to remove any remaining dead mold spores (as even dead mold spores are harmful and can cause an allergic reaction). As always, prevention is much easier and less costly than remediation, so best practice would be to keep in mind the conditions that contribute to infestations and do your best to avoid them. Wanna learn more about mold testing, remediation, and inspection? Visit our mold servicespage. Visit Mold Services Page Thanks to our mold remediation specialist Zach C for lending his expertise to this article. |
SearchArchives
April 2019
|