|
Regular chimney sweeping is a critical aspect of chimney maintenance. It improves air flow and increases draft so that smoke can be drawn upward and out of your home. But more importantly, sweeping, by removing the buildup of flammable creosote, reduces the risk of a dangerous chimney fire. There are several things that you, as an engaged and invested homeowner, can do yourself to keep your chimney clean and to minimize blockages and buildup in the first place.  Put a cap on it!
The single most important and easiest thing you can do to prevent blockage of your flue and protect the health of your chimney is to put a cap on it. A chimney cap fits over the top of your flue, typically with a solid top and screened sides, allowing smoke to escape but preventing the entry of snow and rain, plant debris, and most importantly, nesting animals. Available in a variety of materials (stainless steel, copper, galvanized) and for every size of flue, chimney caps are cheap and easy to place (once you're on the roof, that is). There's simply no reason not to take this minimal step in protecting your chimney. Burn the right type of wood While we're talking prevention, the wood you're using for fuel definitely matters when it comes to the health of your chimney. Hardwoods (e.g. oak, maple, birch) burn hotter than softwoods (conifers) and thus produce less ash and less chimney-clogging creosote. Additionally, burning wood should be well-seasoned—that is, dried--for at least a year but ideally two or three years. Another best practice for preventing buildup is to keep the fire burning hot and not allowing it to smolder and smoke. Smoke is what turns to creosote and coats the inside of your chimney: the less smoke, the less buildup, the less often cleanings are needed. Brush the flue Dedicated DIYers can find various chimney cleaning brushes and tools online. You'll want to find a brush that matches your chimney flue in shape and size—too small and it will just bang around inside without accomplishing much of the scraping that needs to happen for creosote removal; too big and you make your job more laborious and risk damage to the liner or flue, or it could get stuck and break. A chimney can be swept from the roof (top-down method) or from the firebox (bottom-up method), each with its own set of challenges. You'll want to close off the firebox from the living space if you're working from the top down, and if working from the bottom up, prevent debris from entering your home with the help of a powerful vacuum or a plastic sheet placed across the fireplace with a flap for access. Clean the firebox After brushing the flue, the creosote chunks and ashes will fall into the firebox. To remove, you can begin with the fireplace broom and dust pan for larger debris, and a dust extractor or shop vac for the finer dust (spare your household vacuum from this dirty job). A cloth moistened with water will also work fine to collect the finer debris and finish the job. Note that the CSIA (Chimney Safety Institute of America) recommends that unless it's the end of the fire season, about an inch of ash should remain in the fireplace, both to protect the bottom of the firebox and to help maintain the next fire. Where the pros come in Chimney sweeps have the expertise and specialized tools to effectively remove creosote buildup and any blockages from your chimney flue, and to preventively install or replace a chimney cap. Sometimes creosote levels or blockages are such that removal is best entrusted to a professional. Though creosote buildup in its early stages is powdery and fairly easily removable with appropriate brushing, later-stage creosote resembles a tarry glaze and is far more stubborn, requiring more specialized tools. Additionally, a chimney sweep's years of experience help them to diagnose and troubleshoot common chimney problems, such as backdrafting or unpleasant odors, and to check various removable parts, such as the damper and cap, to ensure good condition and functionality. They will look for signs of disrepair in the masonry, such as spalling brickor a cracked chimney crown, and recommend repair if necessary. No matter how well or how often your chimney is cleaned, you'll want to have it inspected initially, upon taking ownership of a new home, and then regularly thereafter so that any areas of disrepair can be identified and addressed before they become more significant and costly. In short, a savvy homeowner will take all necessary preventive measures to maintain the health of their chimney in between cleanings, bringing in a professional regularly to make sure the chimney is free from obstructions and deposits, that it's in good working order, and to check for any signs of disrepair or deterioration. Wanna dig deeper? Download our free tipsheet: 5 Questions to Ask Before Hiring a Chimney Cleaning Company. Download Tipsheet Many thanks to our technicians Roy S and Ben S for lending their expertise to this article.
0 Comments
Thanks to fire safety campaigns and diligent dryer vent cleaning companies, awareness appears to be increasing regarding the hazards associated with a dirty dryer vent. Since your dryer vent serves as the exit for heated air from your dryer to the outside, any blockages or combustibles (think lint, animal nesting) can pose significant danger. Enterprising homeowners often want to tackle this task themselves. Here are some things you can do yourself, to the extent you choose, whether you take on the entire project or tackle a few tasks in between professional cleanings. 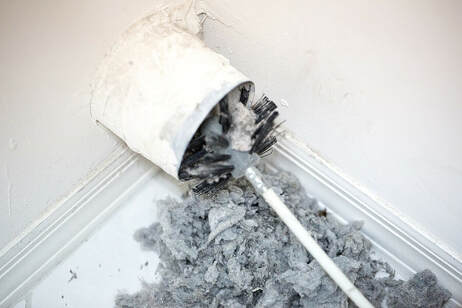 Clean the outside vent
A properly installed dryer vent line begins at the machine itself and exhausts somewhere outside your home. The end of the vent line should be covered in such a way that allows air and lint to escape but prevents animals and debris from entering. Often this is in the form of a hooded vent cover with a damper or flap, or a louvered cover, that opens when hot air from the running dryer forces it open, and then falls back into a closed position by default. A dryer vent should never be covered with a screen, as this can create a fire hazard when lint collects over time in the holes of the screen. If yours has a screened cover, best practice would be to remove it and replace with an appropriate louvered or hooded cover. Large clumps of lint often congregate around the outside vent, at the mouth or just outside of it, on the hood, flap, etc. Remove the cover if possible, and use a brush or vacuum to remove as much lint as you can access. Use a dryer vent cleaning kit (at your own risk) Dryer vent cleaning kits are widely available in home improvement stores and across the internet. Mostly they consist of a set of flexible rods that screw together to create the needed length, and a few different brush heads to place at the end. They can be used from the beginning of the dryer vent line to the outside vent, or from the outside vent in (having disconnected the dryer from the vent line). The brush head rotates with the aid of an electric or cordless drill, and flexible rods are added on for length as the brush head moves deeper and deeper into the vent line. As easy as they sound, these kits have some limitations, as well as risks to the vent line, particularly breaking off inside, which can make retrieval very difficult and may necessitate disassembly of the vent line if the breakage occurs in a ceiling, wall cavity, or other inaccessible area. If it happens above a finished ceiling, for example, you may find yourself ripping out drywall to get to it. In sum, dryer vent cleaning brushes work best on very short, straight runs, in vent lines made of rigid metal. Although, if the line is short and straight enough, the entirety of it can perhaps more easily be disconnected, taken outside and cleaned, and then reassembled with heat foil tape. Where the pros come in If your dryer vent configuration is straightforward and you're willing to invest the time, DIY dryer vent cleaning can be successful. But there are many cases where you're better off forking over the hundred bucks or so for a professional cleaning and the peace of mind that comes with it. Many an HVAC technician has been called to a home after a DIY dryer vent cleaning fail. The most common problems resulting from DIY attempts are breakages of the rods or brush heads inside the vent line, puncturing of flexible duct, disconnecting of the vent line, and pushing all the debris to a specific spot (an elbow, for example) without being able to fully extract it, thereby creating a bigger and more dangerous clog. The advantage of hiring a professional? Besides technician experience and the versatility that comes from it, specialized tools are key. Most (but not all) dryer vent cleaning companies, rather than using a handheld drill and rods with a brush head, use an industrial air compressor to power a "skipper ball" via a flexible air line. The tech feeds a skipper ball attached to an air line from the outside vent all the way through the dryer duct to the back of the dryer. When the tool is engaged, it swiftly spins around and expels pressurized air from tiny holes on its surface. As the technician pulls the tool out, the spinning skipper ball blasts the lint out with it. Because the tool is connected to an air hose, instead of rods, there is almost zero risk of breakage. Because the skipper ball relies on air pressure and a spinning motion as opposed to rigid bristles and aggressive torque, there is little chance of disconnecting the vent line or puncturing it. Rooftop dryer vent cleaning adds another layer of complexity and risk familiar to HVAC technicians that many homeowners will want to avoid. Adequately informed and appropriately equipped, the motivated homeowner can significantly reduce the amount of lint contained in their dryer vent line. A professional can always be called in if things go south, or for those of us who may not be so motivated. Wanna dig deeper? Download our free tipsheet: 5 Questions to Ask Before Hiring a Dryer Vent Cleaning Company. Download Tipsheet Many thanks to our technician Ben S for lending his expertise to this article. Air duct cleaning is a relatively straightforward process: the combination of a vacuum and agitation tools or air pressure is used to clean debris from inside your HVAC ductwork. For savvy and motivated homeowners who are determined to do things themselves, air duct cleaning is also in their sights. Here are some things you can do yourself to help maintain the cleanliness of your air ducts. 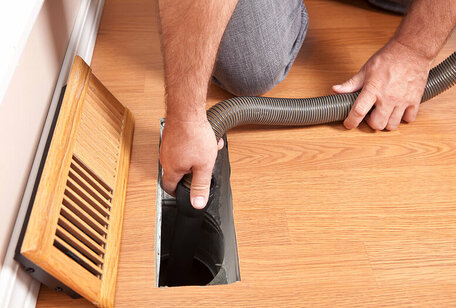 Clean vents and registers
A fair amount of the debris found in your air ducts is located in the area just behind your registers, especially those in the floor. To clean this debris, remove the register and insert a vacuum hose as far as you can reach, sweeping from side to side to collect as much as possible. You'll likely hear debris as it moves through the hose, an indication that the effort was successful. Some DIY sites suggest the insertion of a brush of some kind, even a dryer vent cleaning brush, to loosen debris stuck to the sides. Do this if you feel the need, though it's unlikely to add much to what you collect. The registers themselves are usually easily lifted from the floor or unscrewed from the wall. Once removed, they can be wiped down with a cloth dampened with multi-purpose cleaner or mild detergent. Allow to dry before replacing. Regularly change your air filter This is the single-most important thing you can do in order to keep your air ducts (and furnace) clean. An air filter—or furnace filter--prevents dirt and debris from entering your furnace and clogging up its parts, and further from being deposited in your ducts and recirculated to the rest of your home. In short, most dirt stops at the filter. Keep in mind that a cheap filter will likely allow too many particles through, while the most expensive and effective option may block particles so small they hinder air flow. Best practice would be to opt for something in between the two extremes. But based on how inexpensive filters cost and how easy they are to replace, there's little excuse for not changing them regularly. Vacuum your furnace The motivated homeowner may want to take things a step further and vacuum their furnace's combustion chamber. After ensuring the power to the furnace is off, remove the panel to the combustion chamber. Use your vacuum's attachment tool to carefully suck up any dust and debris from around the various parts. Be careful not to jostle any wires or delicate parts in the process. This measure can be followed up with a wipe-down from a slightly damp cloth to finish. Where the pros come in The above steps can help to reduce the amount of dirt and debris in your duct system but are limited in their reach. Your home's ductwork, because of its vastness and necessarily complex layout, will have many areas that are simply inaccessible with laymen's tools. Professional duct cleaners, with their gas-powered vacuums and flexible air whips designed to easily snake around inside duct systems and thrash debris loose, are equipped to tackle the various challenges presented by diverse configurations and labyrinthine HVAC systems. Further, there are myriad cases when levels of dust and debris are such that the most thorough cleaning available is called for, and no DIY attempts are going to cut it. These cases include the following:
Wanna dig deeper? Download our free tipsheet: 10 Questions to Ask Before Hiring an Air Duct Cleaning Company. Download Tipsheet Many thanks to our technician Zach C for lending his expertise to this article. Air duct cleaning is generally available in various tiers or levels of service, ranging from a simple cleaning to comprehensive and something in between—“good, better, and best,” if you will. With a diversity of tools and techniques available, choosing the one that's right for you can be confusing. Here we'll break down the options available and which level of service is most appropriate for a given situation.
Standard Air Duct Cleaning A standard air duct cleaning is a rudimentary cleaning—the “minimalist” approach. All air duct cleanings will consist of at least a vacuum and air pressure. The vacuum is inserted into the main trunk lines in order to create negative pressure in the ductwork system. Standard practice would then be to use air wands to blow high-pressured air into each of the vents in the branch lines to force debris toward the vacuum. Sometimes this process is helped along by air snakes or skipper balls in the main trunk. These tools consist of a metal ball at the end of an air hose that is fed toward the end of the line. Once engaged, air is forced out of tiny holes in the ball, blasting debris toward the vacuum as the tool is pulled toward the technician. A standard cleaning might be an appropriate choice if your home’s ducts are well-maintained and cleaned regularly, as it removes small amounts of superficial debris; it is not effective for large amounts of debris or stubborn debris that clings to the sides of the ducts, like, for example, pet dander or drywall dust. It is important to remember that the only physical contact of the ductwork in the standard duct cleaning process is the sliding of the skipper ball across the bottom of the main trunks. The sides, corners, and top of the mains and the entirety of the branch lines remain untouched, but for air pressure. Advanced Air Duct Cleaning This mid-level cleaning is a more appropriate starting point in most cases, especially if you’re not sure how long it’s been since your home’s air ducts have been cleaned. It includes the vacuum and air pressure of the traditional cleaning but adds an additional measure in the form of an agitator—a tool designed to physically loosen debris and move it toward the vacuum, used in the main supply and the main return. Perhaps the most familiar agitation tool is the rotary brush--a round brush, attached to a cable, that spins inside the duct and brushes the top, bottom, and sides. Another popular agitator—and arguably more effective—is a multi-tentacled air whip (some brand names include the Octopus Predator or the Viper Clean Sweep). When engaged, the tool’s tentacles thrash vigorously every which way inside the ducts to knock debris loose and send it toward the vacuum. Though the agitation tool renders the advanced a more thorough cleaning than the basic in terms of the trunk lines, the branch lines are typically limited to cleaning with high-pressured air, as they are in the basic cleaning. This advanced level of service is appropriate when most of the debris in the ductwork is located in the main supply and the main return lines. It should be noted that for some duct cleaning companies, this is their highest level of service. Ultimate Air Duct Cleaning Typically each level of service builds on the previous. So just as the advanced includes the process of the standard cleaning and adds the agitation tool in the main trunks, the ultimate or top-level cleaning includes all of the features of the advanced, with the addition of the use of an agitator in not only the main trunk lines but the branch lines (or vents) as well. Sometimes this tool is a smaller version of the agitator used in the mains (e.g. a Viper Microline), the size of which obviates the need to remove any register covers, and sometimes the same agitator is used as is in the main trunks, requiring removal of all register covers. Because in this process an agitator is physically contacting all surface areas of the ductwork, it is the most thorough process available. This level of cleaning is appropriate on taking new ownership of a home, if pets are present, after new construction or remodeling has occurred, or if the homeowner just wants peace of mind that the ducts are as clean as they can be. Typically companies add on extras at this level of service, such as a furnace cleaning, sanitizer, before and after photos, etc. When in doubt, have the technician assess With all that said, if you’re not sure which level of duct cleaning your home needs, and you don’t want to spend more than you have to, most companies have a process whereby the technician can assess the condition of your ducts and make a recommendation before work begins. One of the considerations he’ll take into account is how many stories the home is; that is, how many stories up do the trunk lines extend before they feed into the branch lines and reach each of the rooms. If this is a great distance, you may want to use more than high-pressured air to clean the branch lines. Another fairly reliable (and easy) method for determining how dirty your ducts are is to look inside the vents themselves. If there is a buildup of debris visible when you remove your register covers, it is a fairly safe assumption that the rest of your ducts have a similar buildup. A lack of buildup in the vents would suggest that the majority of debris is located in the main trunks, and the lower or mid-tier cleaning may suffice. An experienced technician will be eager to share his knowledge and help you understand the reasons for his recommendation. Ultimately the choice is yours, but an understanding of the different processes involved, as well as knowledge of the setup and history of your home's HVAC system, will help to appropriately set expectations. Wanna dig deeper? Download our free tipsheet: 10 Questions to Ask Before Hiring an Air Duct Cleaning Company. Download Tipsheet Many thanks to our technicians Roy S and Ben S for lending their expertise to this article.  Cleaning the various components that feed your indoor air should be a routine part of your home maintenance. You wouldn’t go too long without vacuuming your carpet or laundering your bedding, right? That would negatively impact the cleanliness and healthfulness of your indoor environment (and let’s face it, it would be gross).
The same holds true for the cleaning of your home’s heating, ventilation, and duct systems, which contribute—albeit in a less visible manner—to the overall healthfulness and cleanliness of your home environment. And in the case of your chimney and dryer vents, routine cleaning is important not only in terms of indoor air quality and overall system efficiency but more importantly to protect your family and home from two common causes of house fires. Some of the benefits of HVAC cleaning (a category which we will widen to include chimney sweeping and dryer vent cleaning) are as follows. Increased air flow Removing debris from your furnace, ducts, chimney, and dryer vent increases air flow throughout these systems, as its movement is unhindered by dirt and obstructions. When air flow is increased, the appliances and their associated systems work more efficiently, lowering energy bills. Increased air flow also helps to extend the life of your appliances, by reducing how hard they have to work to achieve the same result. A clean and unobstructed dryer vent that moves heated air efficiently dries clothes faster and with less effort. In a clean furnace, the minimization of dust and debris will prevent clogging of the unit and allow the blower to effectively move air through the ducts and into your living space. A clean chimney will improve draft and prevent smoke from blowing back into your home. Decreased contaminants The removal of dirt and debris from your furnace and air ducts, as well as soot and creosote from your chimney, will decrease the presence of contaminants and irritants in your indoor air. Debris trapped in these systems can also contribute to household odors. Creosote buildup in the chimney can cause a musty smell, and air ducts can harbor any number of foul-smelling inhabitants. Our technicians have found all manner of debris inside, including dead animals, bugs, animal feces, old food--anything that can fit down a household vent can become trapped in the air ducts. Elimination of this debris would be the first step in ameliorating the associated odors. Additionally, allergy and asthma symptoms are naturally eased by the decrease in allergens and irritants that results from HVAC cleaning. Decreased risk of house fire When the buildup of flammable debris is such that air flow is impeded because of a partial or complete obstruction, such as a dryer vent clogged with lint, a chimney hindered by creosote buildup, or a furnace flue blocked by an animal's nest, the risk is much greater than simply overworked appliances or compromised indoor air. Clogged dryer vents in particular are notorious for causing house fires. Overall, clean vents, chimneys, and flues create improved draft and air flow, providing free passage of smoke and fumes from your home and allowing your appliances to do what they were intended to do without harm to you or your family. When all is said and done, the cost of HVAC cleaning is relatively inconsequential compared to the often significant risk of allowing buildup to continue unchecked.  To people outside of the HVAC industry (Heating, Ventilation, and Air Conditioning), the various elements that make up the HVAC system can seem murky and vague and consequently are often conflated. The term "furnace ducts" is an example of this tendency. Furnace cleaning and air duct cleaning are sometimes confused, and we often have customers request one when what they really want is the other (or both). Here's the run-down.
What is Furnace Cleaning? Furnace cleaning involves only the individual components of the furnace itself—like the heat exchanger, the blower motor, the combustion chamber, burners, fan, etc. These are typically cleaned with the combination of high-pressured air and an industrial vacuum. Some of the heavy-lifting furnace parts, like the evaporator coil, often require a more specialized cleaning for an additional cost. A quality cleaning minimizes debris in the unit and improves air flow, increasing energy efficiency. It will also reduce the number of contaminants and particles entering your air ducts only to recirculate throughout the system. Furnace cleaning typically does not include cleaning of the ductwork and vents associated with the furnace. What is Air Duct Cleaning? Air duct cleaning is the process of removing dust, debris, and contaminants from your air ducts, including the main supply trunk and main return, as well as the branch lines. Laypeople sometimes refer to it as "vent cleaning," though this term is a little reductive: air ducts are the vast system of (usually) metal tubes that run from your furnace throughout your home, distributing heated or cooled air; vents are simply the point where the ducts open into the house. Duct cleaning utilizes specialized tools such as air whips, snakes, and wands to move debris through the ducts toward an industrial vacuum for removal. Typically, different tiers of service are available, depending on how dirty the ducts are and how long it's been since they were last cleaned. How are the two services similar? Air duct cleaning and furnace cleaning use similar tools: high-pressured air, powerful suction, and sometimes agitators. They both contribute to energy efficiency and improved air flow (and air quality) by reducing the amount of debris and contaminants hindering the HVAC system. The two services are often performed in tandem, for the most comprehensive system cleaning. Because the air ducts and furnace form part of the same system, it is highly likely that if one is dirty, the other is too. Which service do I need? For reasons stated above, it is usually a good idea to have both the furnace and ducts cleaned at the same time—but this is not a hard and fast rule. If your furnace is new (a year or so), and has a properly fitted filter (this is key), it may not need a cleaning yet. However, if your furnace is dirty, it is virtually guaranteed that your air ducts are as well, since the furnace blows air directly into the supply ducts. Regarding air duct cleaning, it is generally recommended that this be performed every two years. Ideally you would start with the highest level of service and then the "maintenance" level service will suffice for the next few cleanings. If you are unsure whether you need either service performed, you can request that the technician conduct a visual assessment and discuss with you (and show you) his findings. To simplify things and maintain a schedule that's easy to keep track of, it's advisable, when first taking up residence in a new home, to have both the air ducts and the furnace cleaned at the highest level so you can be sure that indoor contaminants and debris are minimized. For services thereafter, if you keep on a regular schedule, you'll pay less for the cleaning, and many companies offer a discount on multiple services, increasing the benefit of having both services performed at once. Wanna dig deeper? Download our free tipsheet: 5 Questions to Ask Before Hiring a Furnace Cleaning Company. 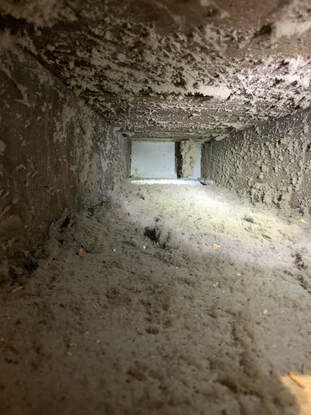 And why is it necessary?
Air duct cleaning is the process of removing dirt, debris, and contaminants from the inside of your home's ventilation system. It is accomplished using specialized tools, including a powerful vacuum to create negative pressure, and agitators and air whips to move the debris toward the vacuum for removal. Because all of the air in your home moves through the air ducts, the cleanliness of your home and your indoor air directly correlate with the cleanliness of your ducts. Additionally, when your air ducts are dirty, your furnace becomes dirty and consequently must work harder to push air through the system, sacrificing energy efficiency and increasing wear on your furnace. Having your air ducts cleaned is an important part of the maintenance of your HVAC system and your home itself. The average cost of air duct cleaning. The cost of the service varies so wildly that even quoting a wide price range will see some service providers fall outside of it, on either end. If we set aside the companies that promise an unrealistic "complete system cleaning" for $49, and those at the other end of the spectrum that have high overhead and thus (arguably) inflated prices, the average range for a quality cleaning would likely fall somewhere between $200 and $600. Though some of the difference in that range is due merely to the difference in pricing among companies, even within the same company the pricing can vary widely, depending on several factors. Some factors that affect cost. Aside from the obvious things, like the size of your home and the number of systems that need to be cleaned, there are a few less obvious factors that will contribute to how much you pay for the service. A transite system, where the ducts run under the floor rather than through the ceiling, because of the complex configuration and difficulty of access, will likely cost you more. Often the only way to effectively clean these systems is with the highest level of service, utilizing specialized tools (cable brushes or tentacled whips) inserted into each vent and connecting an industrial vacuum in multiple spots, rather than just in the trunk lines. The distance from your furnace (where most of the action happens) to the nearest available parking can also affect the cost. If your residence is several floors up, precluding the use of van-mounted equipment, the use of portable equipment may also carry an additional charge. If your main trunk lines are not accessible (for example, because of a finished basement where Sheetrock covers the ducts), this will call for a different technique and additional labor, at a higher cost. This scenario is fairly common in townhomes, where the furnace is located in a closet. The difference among levels of service. Duct cleaning epitomizes the expression "you get what you pay for." This is not necessarily to say that the more you pay, the better the service, but rather that it is unrealistic to expect that quality service can be had on the cheap. Companies generally offer tiers of service, with the lowest level being along the lines of a maintenance cleaning, relying solely on negative pressure and powerful air wands to accomplish the task. This level should be elected only if your air ducts are cleaned regularly. Each higher tier generally utilizes a different technique, specialized tools, and a more laborious and time-consuming process—for example, the insertion of brushes or air whips down each of the branch lines, as opposed to the use of merely high-pressured air. A higher-level cleaning will also likely include cleaning of other related components of your HVAC system—your furnace or evaporator coil, for example. Considerations before making a decision. It pays to have done a little bit of homework and know your basics before summoning a technician to your home to perform the service. There's lots of information out there to help the layperson understand the basics of HVAC cleaning, and even a thin foundation can help you to ask informed questions and get the most out of your service. What level of service would you recommend and why? What tools do you use and how do they work? Can you show me how dirty my ducts are before I select a service? Will I be able to see the results? Etc. In terms of cost, air duct cleaning, when performed carefully and effectively, claims its worth in the form of a smoothly functioning HVAC system, decreased indoor air pollutants, and increased energy efficiency. Wanna dig deeper? Download our free tipsheet: 10 Questions to Ask Before Hiring an Air Duct Cleaning Company. Download Tipsheet Many thanks to our technician Ben S for lending his expertise to this article. And why is it necessary?The first thing to point out about the cost of dryer vent cleaning is that the risks of not having it done could be much more costly. The US Fire Administration says that "2,900 home clothes dryer fires are reported each year," and of those fires, the leading cause is failure to clean the dryer. The reason is simple: as your clothes dryer works to dry your laundry, small bits of lint come loose from the fabric. Many of these end up in the lint trap, but some of them make their way into the ducting system, testimony of which is seen in the form of small bits of lint clinging to the outside vent. Each time you run your dryer, more lint is added to this accumulation and, unchecked, it can form a clog. Dryer lint is extremely combustible, and a dryer vent line clogged with lint is an accident waiting to happen.
The average cost of dryer vent cleaning. Hiring a professional to clean your dryer vent will usually cost between $100 and $200, depending on a few factors. Do-it-yourself kits, consisting of a brush head and some flexible rods that fit onto the end of a drill, can be had for as little as $16, but unless your dryer vent is extremely straightforward (few turns, not too long, not exiting onto the roof, etc.), a professional service would be recommended to ensure a thorough job. The last thing you'd want to do with a DIY kit is compact the lint further but not be able to expel/remove it, causing even more of a fire hazard. Factors that increase cost. If you're lucky, your dryer has a short, straight vent line that goes right from the unit to the outside, on the first floor, in a matter of a few feet. But many dryers don't. The single condition that's almost guaranteed to cause you to have to pay more for the service is if your dryer vents onto the roof. For reasons of increased labor and increased risk/liability for the service company, these jobs are going to be more costly. A long vent run--say, more than 15 or 20 feet—may also cost you more, as might a vent line with several twists and turns. Townhomes, for example, often have clothes dryers that are located near the center of the residence, requiring the vent line to extend tens of feet and several turns to reach a wall before venting outside. Simply speaking, any factor that makes the job more laborious, risky, or time-consuming will likely mean you'll pay more. Still worth it. In the grand scheme of things, at least within the realm of property ownership, the $100 or so you'll pay to have your dryer vent cleaned is well worth the peace of mind that you've greatly reduced your risk of house fire. Additionally, the increased air flow translates into energy efficiency and a lower utility bill, as well as shortened drying time for your laundry. A cost-benefit analysis would point to a pretty clear win for dryer vent cleaning. Wanna dig deeper? Download our free tipsheet: 5 Questions to Ask Before Hiring a Dryer Vent Cleaning Company. 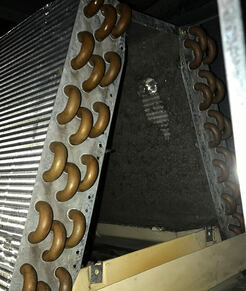 The A-coil (or evaporator coil) gets its name from its triangular shape and is a critical component of your HVAC system. It is usually located above the furnace. All the air that circulates through your system passes through the A-coil before it exits the supply vents into the desired rooms, whether your system is heating or cooling. For this reason, it is highly susceptible to buildup of dust, dirt, and contaminants. Keeping the A-coil clean of buildup is one of the most important things you can do for your HVAC system. When it is dirty or clogged, air flow is greatly compromised, causing your system to work much harder to achieve the desired temperature.
What are the signs of a clogged A-coil? Of course the surest sign of a clogged coil is its visual appearance, in cases where it is accessible and not encased. (The one pictured above is a casualty of "filter bypass," with all manner of debris, including dog hair, bypassing the air filter and adhering directly to the coil.) Even the thinnest layer of grime covering its fins will significantly decrease air flow. One of the first indications a homeowner will usually have of a dirty A-coil is diminished air flow from the air vents (though this could also be caused by a damper control issue). An increase in monthly heating/cooling costs often accompanies a dirty A-coil as well, as the system must work harder and use more energy to reach the target temperature. What causes a clogged A-coil? The A-coil will naturally dirty over time, since it is consistently exposed to the air being circulated by the blower. There are, however, several key factors that will contribute to its becoming dirtier than usual, or becoming dirty more quickly than usual, and most of these are filter-related. A too-cheap air filter will often allow particles too large to pass through, resulting in more debris becoming clogged between the fins of the coil. An incorrectly sized or ill-fitting filter can allow for filter bypass, when debris is able to sneak around the filter and directly into the components of your furnace, particularly the A-coil. Of course, many a technician has opened up a furnace to find no filter at all, which is obviously extremely detrimental to the furnace components, which must be clean of debris in order to effectively transfer heat and use energy efficiently. How is an A-coil cleaned? A-coils are situated on top of the furnace and are often "hidden" behind a panel and may or may not be reasonably accessible. Before cleaning, an access point is created directly above the coil so the technician can look from above to see where he can safely cut to access the side of the coil without puncturing any of the copper lines. Once access is created there, the technician can cut access into the underside of the coil, where the cleaning tools will be inserted. Tools used will vary depending on the job but generally include high-pressured air wands, an air whip (such as the Viper), an industrial-strength vacuum, a three-inch round dust-brush head, and sometimes non-rinsing coil cleaner. How much does an A-coil cleaning cost? Coil cleanings vary widely in price, mostly due to issues of accessibility, but how dirty the coil is will affect the price as well. Most companies will bid A-coil cleanings rather than advertise set prices, because the nature of the job will differ greatly from one unit to another. It's well worth keeping in mind that whatever you spend to get your coil cleaned will easily be recovered in the form of increased energy efficiency, lower heating and cooling costs, and increased lifespan of your unit. Many thanks to our technician Ben S for lending his expertise to this article.  We've said it before but it bears repeating: A chimney without a chimney cap is essentially a hole in your roof, providing entry for all kinds of critters, debris, and weather elements into your flue and into your home. You wouldn't leave your window open and your home accessible to these intruders--why would you leave your roof open?
What is a chimney cap and how much does it cost? Priced starting around $150 (with installation), a cap is a minimal investment with a high return in the form of damage prevention and minimization of wear. A chimney cap is a metal top that attaches to the flue tile, covering the chimney flue (the opening in your chimney)--either the fireplace flue or the utility flue. They can be found in aluminum, stainless steel, copper, and other metals. Galvanized steel and aluminum are on the lower end of the durability (and cost) spectrum, stainless steel toward the center, and copper would be at the far end of the spectrum, offering much durability, but at a higher cost. Why should I install a chimney cap? One of the primary reasons to install a cap is to keep animals, who are drawn to the warmth of your chimney, from setting up house there. They often enter only to find that they cannot leave, then become trapped and die, at which point they become a nuisance and a health hazard (and extremely odorous). A properly installed cap will also prevent leaves, twigs, and other natural debris from clogging up your flue and creating a fire hazard. Caps equipped with mesh screens (spark arrestors) help to prevent sparks from your fireplace from traveling up the flue and igniting your rooftop, potentially causing a house fire. Covering that hole in your rooftop with a cap will also help to prevent downdrafts, the downward push of air that can cause smoke to blow back into your home when you have a fire in the fireplace. Do false flues need caps? The short answer is yes. False flues are flues that exist for aesthetic purposes only and do not serve to vent any gases or smoke. They are often filled with cement or otherwise closed up. However, even a false flue, though it is not a "hole," should be capped. A cap on a false flue (as well as a true flue for that matter) will divert water away from the clay flue tile and the concrete crown. Without a cap, water pools at the intersection of the crown and the flue tile and then freezes and expands, eventually cracking the crown, which then becomes a major and costly repair. With all of the benefits of a cap, at minimal expense, one would be hard-pressed to justify not having one. Your chimney has a great role to play in service of your home and in its identity and value. Leaving it uncapped is practically an insult (lucky they don't have egos). So go ahead—close those doors and windows, and cap your chimney! Wanna learn more about chimney caps? Visit our chimney caps and covers page. Visit Chimney Caps Page Many thanks to our technician Ben S for lending his expertise to this article. |

Twin Cities Furnace Cleaning - Open 7 Days a Week 8AM to 8PM